Install optional drivers
In general, macOS “knows” the printers in our institute, and it is not necessary to install additional software for using them. However, in particular for the Canon printers in the four printer islands and the semi printing plant in the library, you presumably want to use optional features like hole punching or automatic stapling. In this case, you need so-called “printer descriptions” to teach your Macintosh what options are available. See this page for instructions.
Add a printer
Scattered over the building, the institute provides more than 50 printers. To enable one of these on your Mac, please do the following:
-
From any application capable of printing, choose File->Print… to open the print dialog.
-
In the Printer: popup menu (top right), choose “Add Printer…”
-
Choose the printer you’d like to use from the list
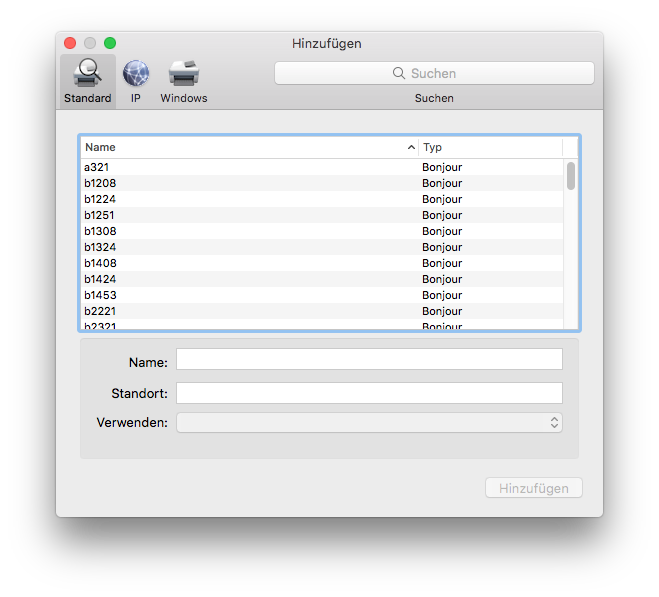
The naming scheme is simple: It just contains the location of the printer in the building. If there is more than one in a single location, a lowercase letter is added to the name. Make sure to choose one of these which are of type “Bonjour”. (There might be other printers in the long list – please ignore them.)
-
Wait a few seconds, the three fields below the list should be filled in automatically. Yes, that’s all. No installation of additional drivers, no scanning for the right print server is needed.
-
Click “Add”. Most of our printers have custom options like additional paper trays or a stapling unit. Choose what is appropriate in the optional dialog sheet coming up.
That’s it.
Note: You need Mac OS X 10.2 Jaguar or newer for this procedure to work. You must set up the printer manually with the Printer Setup Utility selecting AppleTalk as the printing protocol if you run Mac OS X 10.0 Cheetah or 10.1 Puma.
If your Macintosh runs Mac OS 9 or an older version of the Macintosh OS (yes, we do support System 7), use the Chooser in the Apple Menu to select a printer with the LaserWriter symbol.
Remove a printer
-
Open System Preferences from the Apple menu.
-
Choose the Printers and Faxes control panel.
-
Select the printer icon to be removed.
-
Click the Minus at the lower left corner of the list.
-
Click Delete Printer.